How To Pack A Compact Emergency Kit For Routine Car Care
A practical step-by-step guide to how to pack a compact emergency kit for routine car care, including preparation, instructions, common issues, tips, and next steps.
How To Pack A Compact Emergency Kit For Routine Car Care
A compact emergency kit for routine car care keeps you prepared for common roadside issues without taking up much space. This guide explains how to assemble a practical kit using everyday tools and supplies, emphasizing regular checks, seasonal adjustments, and safe usage. You will learn what to include, how to store it, and how to handle minor problems like a dead battery or low tire pressure. The goal is to help you solve small troubles quickly and avoid being stranded, while also recognizing when professional help is needed. The guide is written in plain English and focuses on actionable steps, so you can confidently build and maintain your own kit.
Fast Answer
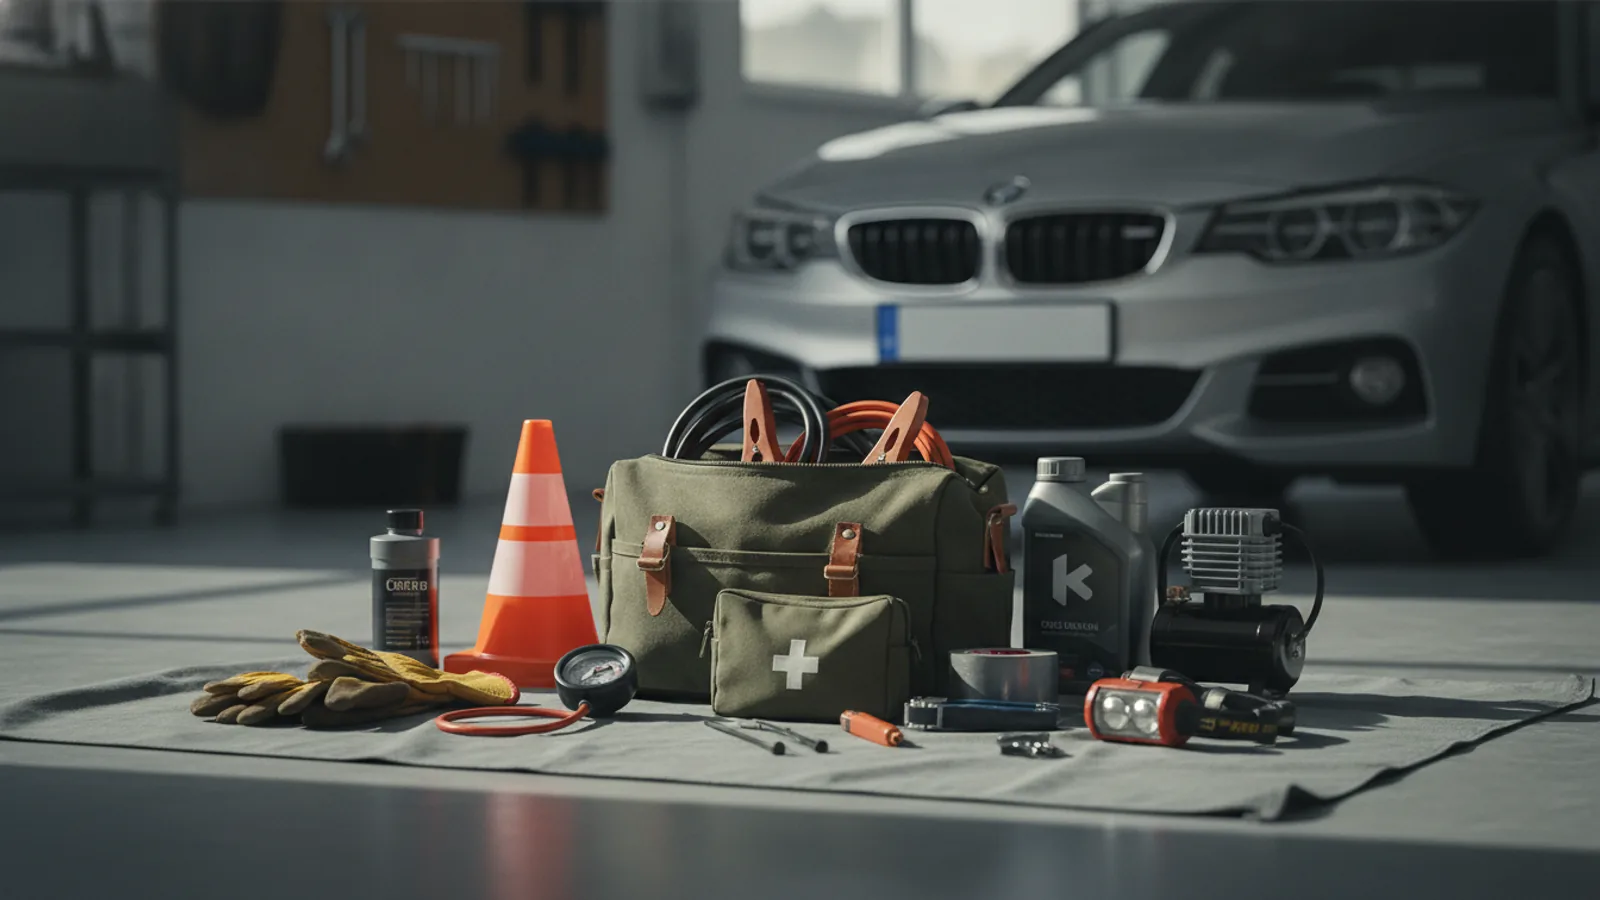
- Assemble a small bag with a flashlight, jumper cables, tire pressure gauge, basic hand tools, a first-aid kit, and emergency contact numbers. Place it in an easily accessible spot in your car, like the trunk or under a seat.
- Check your emergency kit every season: replace expired items, ensure batteries work, verify tire pressure gauge accuracy, and swap out any damaged tools or supplies. Keep a list of what's inside and update it as needed.
Before You Start
- Choose a durable, water-resistant container like a small tool bag, plastic bin, or backpack. Ensure it fits securely in your car without rolling around, and consider using a bright color or label for visibility.
- Gather basic tools: a multi-tool or set of screwdrivers, pliers, an adjustable wrench, and a utility knife. Add duct tape and zip ties for quick fixes on loose parts or hoses.
- Include tire-related items: a portable tire pressure gauge, a can of tire sealant (if allowed by your vehicle), and a pair of work gloves to protect your hands during changes.
- Have a visibility kit: a reflective triangle or vest, a headlamp or flashlight with extra batteries, and a phone charger that works with your car's power outlet. Keep a paper copy of emergency numbers in case your phone dies.
Step-by-Step Instructions
Select and Prepare Your Container
Begin by choosing a container that is compact yet spacious enough for all your items. A small tool bag, a plastic bin with a lid, or an old backpack works well. Make sure it is made of durable, water-resistant material to protect your supplies from moisture. The container should fit easily in your car, either in the trunk, under a seat, or in a cargo area, and stay in place when you drive. Attach a label or use a bright color to make it easy to find. Inspect the container for any rips, holes, or broken zippers, and replace it if needed. This step matters because a sturdy, identifiable container ensures your items stay organized and accessible during an emergency, even in low light or bad weather.
Gather Essential Tools
Collect a set of basic hand tools that can handle minor roadside repairs. At minimum, include a multi-tool or a set of screwdrivers (flathead and Phillips), pliers, an adjustable wrench, and a utility knife. Wrap the knife in a protective sheath or keep it in a separate pouch. Roll these tools in a cloth or place them in a tool roll to avoid rattling and damage. Add duct tape and a few zip ties, as these can temporarily secure loose hoses, mirrors, or trim. Verify that each tool is in working condition: no rust, cracks, or bent parts. This step matters because having functional tools allows you to make simple fixes like tightening a loose battery terminal or securing a detached part, which can prevent further damage and keep you safe until you reach a repair shop.
Assemble Tire-Related Supplies
Put together the tire items you might need for a flat or low-pressure situation. Start with a reliable tire pressure gauge; either a traditional stick-style gauge or a digital one, but make sure you know how to use it. Add a can of tire inflator and sealant, but only if your vehicle manufacturer approves its use, as some systems (like TPMS) may react differently. Include a pair of work gloves to keep your hands clean and protected. Optionally, you can add a tire repair kit with plugs and tools, but only if you have practiced using it. Check the sealant's expiration date and replace it as needed. This step matters because maintaining proper tire pressure improves fuel efficiency and handling, and a quick fix can get you to a service station safely, reducing your risk on the roadside.
Add Visibility and Safety Items
Include items that make you visible to other drivers and help you during an emergency. A reflective triangle or two and a reflective vest should be stored in an easily reachable place. A flashlight with extra batteries is essential; consider a headlamp to keep your hands free. Add a small first-aid kit with bandages, antiseptic wipes, adhesive tape, and pain reliever. Include a phone charger that plugs into your car's power outlet and a spare cable. Keep a laminated card with emergency numbers, your insurance information, and your vehicle's details. This step matters because being visible reduces the chance of a secondary accident, and having light is crucial for working at night. A first-aid kit helps you manage minor injuries while you wait for help.
Pack the Kit and Secure It
Arrange the items in your container so that the most-used things are on top or in separate pouches. Place the tire gauge, flashlight, and gloves near the top. Group tools together, and keep the first-aid kit accessible. Make sure all lids are closed, and zip bags are sealed to avoid spills. Then, place the kit in your car in a spot that doesn't move during turns or stops, like the trunk floor or under a seat. Use a cargo net or bungee cord to secure it if needed. Check that the kit doesn't block your view or access to the spare tire. This step matters because an organized kit allows you to find items quickly without rummaging, and a secured kit prevents it from becoming a projectile in an accident.
Maintain and Review Your Kit
Set a reminder to check your emergency kit every three months and after each major trip. Open the kit and inspect every item: check battery levels by turning on the flashlight, replace any used or expired supplies (like bandages or sealant). Wipe down tools to remove rust, and test the tire gauge for accuracy. Confirm that the reflective items are clean and not damaged. Update your emergency contact card if you change phone numbers. If you use any item from the kit, replace it as soon as possible, and note this on a checklist. This step matters because a well-maintained kit is reliable when you need it, and regular checks help you catch damage or expiration before an emergency occurs.
Quick Reference
| Situation | Action | Why it helps |
|---|---|---|
| Your tire warning light turns on while driving on a straight road with no obvious flat. | Pull over safely to a flat, level area away from traffic. Use your tire gauge to check the pressure of all four tires, including the spare if you have one. | A warning light can indicate under-inflation due to temperature changes or a slow leak, so checking the actual pressure helps verify the situation. |
| Your car battery dies when you are at a parking lot and you have jumper cables in the kit. | Find a donor car with a working battery, park them close so the cables reach, and follow the correct order: positive to positive, then negative to a metal ground on your car. | Correct cable connection reduces the risk of sparks and damage to the electrical systems of both vehicles. |
| You need to fix a loose bumper or fender that is dragging on the road. | Use zip ties or duct tape from your kit to secure the part temporarily, making sure it does not interfere with wheels or lights, and drive slowly to a repair shop. | Temporary fastening prevents further damage and avoids potential hazards like the part falling off or causing an accident. |
Common Issues
- Flashlight batteries corrode or leak if left too long.: Take out the batteries when storing the flashlight for long periods, but keep a spare set of fresh batteries in a sealed bag. Check and replace them every few months or if you notice any corrosion.
- Tire sealant cans expire and may not work when needed.: Check the expiration date on the sealant can at each kit review, and replace it before it expires. Also, read the instructions to ensure it's compatible with your tire type.
- You pack too much, making the kit bulky and hard to reach.: Stick to the essentials listed in this guide and resist adding non-essential items. If you find yourself adding much more, invest in a larger container or consider a separate bag for different situations, but keep the core items accessible.
Advanced Tips
- Practice using a tire repair kit on an old tire at home, so you are comfortable with the process if you ever need it on the road.
- Consider including a small solar-powered charger for your phone, but understand that it may charge slowly and require direct sunlight.
- If you live in a cold climate, add a small emergency blanket and a pack of hand warmers to your kit during winter months.
Final Checklist
- Check your emergency kit location is known to you and other regular drivers of the vehicle.
- Verify that all tools are clean, functional, and free of damage.
- Review that all batteries, including flashlight and phone charger, are charged and unexpired.
- Schedule a date in your calendar to do a full kit inspection within the next three months.
FAQ
What items should I absolutely not leave out of the kit?
The must-haves are a working flashlight, jumper cables, a tire pressure gauge, and a basic tool like a multi-tool. These can help you resolve the most common issues: a dead battery, low tire pressure, and minor tool-requiring fixes. You should also include a first-aid kit and some way to signal for help, such as reflective triangles.
How often should I replace the items in the emergency kit?
It is best to review the entire kit every three months. Replace any expired supplies like bandages, tire sealant, or batteries. Also, check that the flashlight works and that tools haven't rusted. At least once a year, consider replacing items that show signs of wear, even if they seem usable.
Can I use generic household items instead of buying a ready-made kit?
Yes, because many household tools and supplies work just as well. For example, you can use a sturdy tote bag as your container, a regular screwdriver from your home, and a basic first-aid kit. Just make sure they are dedicated to the car kit so you always have them where you need them.